Cadd Pump Instructions: A Comprehensive Guide

Today’s date is 12/20/2025 19:19:40. This guide details operating Cadd pumps, covering installation, maintenance, and troubleshooting, ensuring efficient fluid transfer for various applications.
Understanding Cadd Pumps
Cadd pumps are engineered for precise fluid delivery, commonly utilized in diverse sectors like chemical processing, water treatment, and laboratory applications. These pumps excel at handling various fluid types, from corrosive chemicals to viscous liquids, offering reliability and accuracy.
Understanding the core principles of Cadd pump operation is crucial for effective use. They typically employ positive displacement mechanisms, ensuring a consistent flow rate regardless of pressure fluctuations. This contrasts with centrifugal pumps, where flow varies with pressure.
Booking a flight from Shannon (SNN) to Cologne-Bonn (CGN) highlights the importance of selecting the right tool for the job, much like choosing the appropriate Cadd pump model for your specific fluid and application. Jetcost and Cheapflights.co.uk offer comparisons, mirroring the need to evaluate pump specifications.
Familiarizing yourself with pump terminology – flow rate, pressure head, and net positive suction head (NPSH) – will enhance your understanding and optimize performance. Proper selection and operation are key to maximizing pump lifespan and efficiency.
Types of Cadd Pumps Available
Cadd pumps come in several configurations, each suited for specific applications. Peristaltic pumps are popular for sterile fluid handling, as the fluid only contacts the tubing. Diaphragm pumps excel with abrasive or viscous fluids, offering self-priming capabilities.
Gear pumps provide precise metering and are ideal for applications requiring consistent flow rates. Lobe pumps are another option for handling delicate fluids, minimizing shear. Similar to finding the best flight from Shannon to Cologne-Bonn (SNN-CGN) – as detailed on sites like KAYAK – selecting the right pump type is vital.
Consider factors like fluid viscosity, chemical compatibility, and required flow rate when choosing a Cadd pump. Just as comparing airlines (Jetcost) is essential for travel, comparing pump specifications is crucial for optimal performance.
Understanding these distinctions ensures you select a pump that meets your exact needs, maximizing efficiency and minimizing downtime. Each type offers unique advantages, making informed selection paramount.
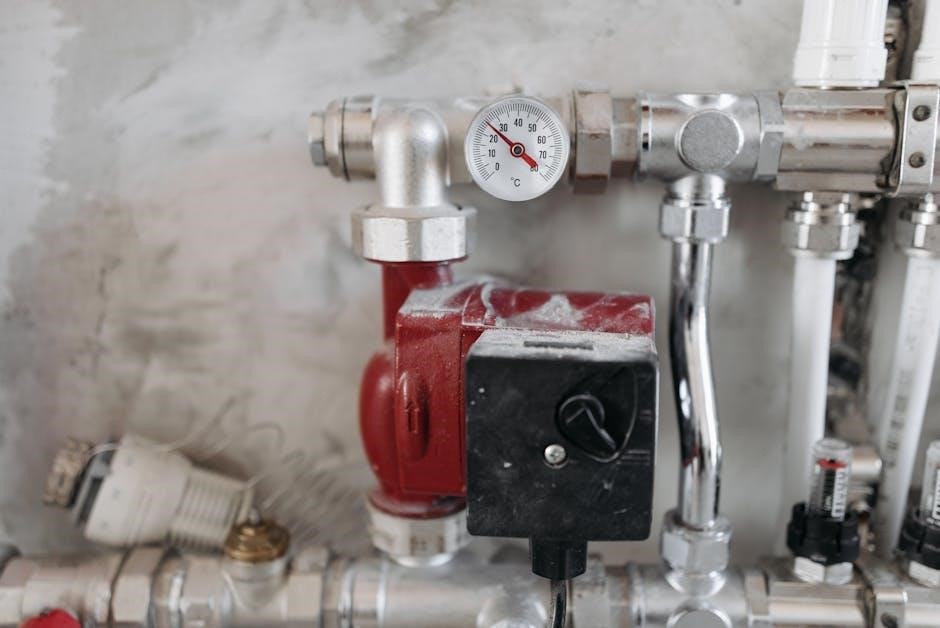
Cadd Pump Components & Identification
A typical Cadd pump consists of several key components. The pump head houses the pumping mechanism – peristaltic rollers, a diaphragm, or gears – depending on the pump type. A motor drives this mechanism, controlling the flow rate. Tubing (for peristaltic pumps) or impellers are crucial fluid-contact parts.
The control panel allows for adjusting settings and monitoring performance, much like searching for flights from Shannon to Cologne (Cheapflights.co.uk) allows for setting preferences. A power supply provides the necessary electricity. Identifying these components is vital for maintenance and troubleshooting.
Look for model numbers and serial plates for accurate identification. Refer to the pump’s manual for detailed diagrams and part lists. Understanding each component’s function, similar to understanding airline routes (Jetcost), is key to effective operation. Regular inspection of these parts ensures longevity and prevents failures.
Proper identification facilitates ordering replacement parts and performing repairs efficiently.

Installation of Cadd Pumps
Confirming flight details from Shannon to Cologne (SNN-CGN) is key. Proper installation ensures optimal performance; follow the checklist, mount securely, and connect plumbing and electrical safely.
Pre-Installation Checklist
Before commencing installation, mirroring flight preparation from Shannon to Cologne, a thorough checklist is crucial. First, verify the pump model matches your application requirements. Confirm the availability of all necessary components – fittings, hoses, electrical connections, and mounting hardware. Inspect the pump for any shipping damage; report any issues immediately;
Ensure the installation location meets the pump’s environmental specifications, considering temperature, humidity, and ventilation. Check the power supply voltage and frequency align with the pump’s requirements. Verify adequate space around the pump for maintenance and access. Review local electrical codes and plumbing regulations to ensure compliance. Gather all required tools – wrenches, screwdrivers, electrical testers, and safety equipment. Finally, familiarize yourself with the complete installation manual before beginning the process, similar to reviewing flight itineraries.
Mounting the Cadd Pump
Securely mounting the Cadd pump, much like ensuring a smooth flight from Shannon to Cologne-Bonn, is paramount for optimal performance and longevity. Begin by selecting a stable, level surface capable of supporting the pump’s weight, including the weight of any connected fluids. Utilize appropriate mounting hardware – bolts, screws, or brackets – compatible with both the pump and the mounting surface.
Ensure the pump is firmly attached, minimizing vibration and noise. Consider using vibration dampening pads between the pump and the mounting surface. Maintain adequate clearance around the pump for servicing and inspections. Avoid mounting the pump in direct sunlight or near heat sources. Double-check all mounting hardware is tightened to the manufacturer’s specified torque. Proper mounting prevents stress on connections and ensures stable operation, mirroring the importance of secure luggage handling during travel.

Connecting Plumbing & Electrical
Similar to booking a flight from Shannon to Cologne-Bonn requiring careful attention to detail, connecting the plumbing and electrical components of your Cadd pump demands precision. Begin by ensuring the power supply matches the pump’s voltage requirements. Use appropriately sized wiring and conduit, adhering to local electrical codes. Ground the pump properly to prevent electrical hazards.
For plumbing connections, utilize compatible fittings and sealant to prevent leaks. Ensure all connections are tight and secure. Prime the suction line before operation to avoid cavitation. Double-check the direction of flow, indicated on the pump housing. Inspect all connections for leaks after initial startup. Like confirming your flight details, verifying these connections is crucial for safe and efficient operation. Remember to consult the pump’s wiring diagram and plumbing schematic for specific instructions.

Operating Cadd Pumps
Finding the best flight from Shannon to Cologne involves careful searching; similarly, proper operation requires following startup, priming, and flow rate adjustment procedures for optimal performance.
Initial Startup Procedure
Before initiating the Cadd pump, mirroring the thoroughness needed when booking flights from Shannon to Cologne-Bonn (SNN-CGN) with eDreams or Jetcost, a meticulous pre-check is crucial. Verify all connections – plumbing and electrical – are secure and correctly installed, referencing the installation guide.
Ensure the pump housing is free of debris and that the suction line is fully submerged in the fluid. Open all valves in the discharge line gradually. Connect the power supply and switch on the pump. Observe the pump for any unusual noises or vibrations during the initial power-up.
Monitor the pressure gauge; it should begin to register pressure as the pump starts to move fluid. If the pump fails to start or exhibits abnormal behavior, immediately disconnect the power and consult the troubleshooting section. Like comparing deals on Cheapflights.co.uk, a careful start ensures longevity.
Priming the Cadd Pump
Priming is essential if the Cadd pump loses its prime, similar to securing the best flight route from Shannon (SNN) to Cologne-Bonn (CGN) – it requires a systematic approach. Begin by closing the discharge valve. Locate the priming port, typically on the pump housing. Slowly pour fluid into the priming port until the pump and suction line are completely filled, eliminating any air pockets.
Once primed, open the discharge valve slightly to allow air to escape. Continue adding fluid as needed to maintain a full prime; Monitor the pump’s operation; a properly primed pump will exhibit a steady flow and consistent pressure.
If the pump struggles to maintain prime, check for leaks in the suction line or connections. Like finding last-minute flight deals, persistence is key. Repeat the priming process until a stable prime is achieved, ensuring optimal pump performance and preventing damage.
Adjusting Flow Rate & Pressure
Fine-tuning flow rate and pressure is crucial for optimal Cadd pump performance, much like securing the best flight price from Shannon to Cologne – it requires careful adjustment. Most Cadd pumps feature a control valve or adjustable speed drive. To increase flow rate, gradually open the control valve or increase the speed setting.
Conversely, to decrease flow rate, close the valve or reduce the speed. Monitor the pressure gauge to ensure it remains within the pump’s specified operating range. Adjustments should be made incrementally, observing the impact on both flow and pressure.
Remember that altering flow rate directly affects pressure, and vice versa. Like comparing airline routes, understanding the relationship is key. Consistent monitoring and small adjustments will yield the desired results, maximizing efficiency and preventing system overload.

Maintenance & Troubleshooting
Regular checks, similar to finding cheap flights from Shannon to Cologne, are vital. Inspect for leaks, unusual noises, and performance drops; address issues promptly for longevity.
Routine Maintenance Schedule
Establishing a consistent maintenance schedule is crucial for optimal Cadd pump performance and longevity. Weekly inspections should focus on visual checks for leaks around connections, ensuring all fittings are tight, and verifying proper electrical connections – much like checking for the best flight deals from Shannon to Cologne.
Monthly tasks include lubricating moving parts according to the manufacturer’s specifications, cleaning the pump housing to prevent debris buildup, and checking the fluid levels. Similar to comparing airline routes, regular fluid analysis can identify potential issues before they escalate.
Semi-annual maintenance requires a more thorough inspection of internal components, such as impellers and seals. Replace worn parts proactively. Annually, a complete pump overhaul, including professional inspection and potential replacement of critical components, is recommended. Keeping detailed maintenance logs, like tracking flight booking details, will help identify trends and predict future maintenance needs, ultimately minimizing downtime and maximizing the pump’s lifespan.
Common Issues & Solutions
Several issues can arise during Cadd pump operation. Loss of prime is frequent; solutions include checking for air leaks in the suction line and ensuring adequate fluid supply – akin to finding the best flight connections from Shannon to Cologne. Reduced flow rate often indicates a clogged impeller or strainer; cleaning these components usually resolves the problem.
Excessive noise can signal bearing failure or cavitation. Inspect bearings for wear and address any suction-side restrictions. Leaks typically stem from loose connections or damaged seals; tighten connections or replace seals as needed.
Electrical issues, like motor failure, require professional diagnosis and repair. Always disconnect power before inspecting electrical components. Just as monitoring flight prices is essential, regular pump monitoring can help identify problems early. If issues persist, consult the manufacturer’s documentation or a qualified technician. Prioritizing safety and prompt attention to problems prevents further damage and ensures continued reliable operation.
Winterizing Your Cadd Pump
Proper winterization prevents damage from freezing temperatures, much like securing a flight from Shannon to Cologne during peak season. Drain all fluids from the pump casing, suction line, and discharge line. Open drain plugs and allow complete drainage – don’t leave any liquid behind.
Remove and store any impellers or strainers to prevent cracking. Inspect seals and gaskets, replacing any that show signs of wear. Apply a non-toxic antifreeze specifically designed for pumps to internal components for added protection, if complete draining isn’t possible.
Disconnect the pump from its power source and store it in a dry, sheltered location. Cover the pump to protect it from dust and debris. Regularly check the stored pump for any signs of damage. Following these steps ensures your Cadd pump is ready for operation when warmer weather returns, similar to having a confirmed flight booking.
Safety Precautions
Always prioritize safety! Disconnect power before maintenance, handle fluids carefully, and understand emergency shutdown procedures – like confirming a flight from Shannon to Cologne.

Electrical Safety Guidelines
Prioritize electrical safety when working with your Cadd pump. Always disconnect the power supply at the breaker before performing any maintenance or inspections. Verify the power is off using a reliable voltage tester to prevent accidental shock. Ensure all electrical connections are properly grounded, adhering to local electrical codes and regulations.
Inspect power cords regularly for damage – fraying, cracks, or exposed wires – and replace them immediately if any issues are found. Never operate the pump with a damaged cord. Avoid using extension cords whenever possible; if necessary, use a heavy-duty extension cord rated for the pump’s amperage.
Protect electrical components from moisture and direct water exposure. Consider using Ground Fault Circuit Interrupters (GFCIs) in damp locations to provide an extra layer of protection. Remember, similar to booking flights from Shannon to Cologne, careful planning and attention to detail are crucial for safe operation.
Handling Pump Fluids
Always identify the fluid being pumped before operation. Refer to the Safety Data Sheet (SDS) for specific handling precautions, including personal protective equipment (PPE) requirements like gloves, eye protection, and respirators. Avoid direct contact with the fluid, as it may be corrosive, flammable, or toxic.
Ensure proper ventilation when handling volatile fluids to prevent the buildup of hazardous vapors. Contain any spills immediately using appropriate absorbent materials and dispose of them according to local regulations. Never mix incompatible fluids, as this could create dangerous reactions.
Similar to researching cheap flights from Shannon to Cologne, understanding the properties of the fluid is essential. Regularly inspect the pump components for signs of corrosion or degradation caused by the fluid. Proper fluid handling extends pump life and ensures operator safety, much like a well-planned journey.
Emergency Shutdown Procedures
In any emergency, immediately cease pump operation. Locate and depress the emergency stop button – typically a large, red mushroom-shaped button – to cut power to the pump. If an emergency stop button isn’t accessible, disconnect the power supply at the circuit breaker or unplug the pump from the electrical outlet.
Assess the situation quickly and safely. Identify the cause of the emergency, such as a leak, spill, or unusual noise. Evacuate the area if necessary, and alert personnel. Do not attempt repairs until the pump is completely de-energized and the hazard is neutralized.
Like finding the fastest flight from Shannon to Cologne, swift action is crucial. Following these procedures minimizes damage and prevents injury. Document the incident thoroughly for future analysis and preventative measures, ensuring a safe working environment.
Advanced Features & Settings
Like booking flights from Shannon to Cologne, Cadd pumps offer customizable settings via the control panel, enabling remote monitoring and programming for optimal performance;
Using the Control Panel
The Cadd pump control panel serves as the central hub for managing and monitoring pump operations. Familiarize yourself with the layout, identifying key indicators like power status, flow rate, and pressure readings. Navigation is typically achieved through a combination of buttons and a digital display.
To adjust settings, use the directional arrows to scroll through menu options. The ‘Enter’ or ‘Select’ button confirms your choices. Pay close attention to units of measurement – ensure they align with your application requirements. The panel often displays error codes; consult the troubleshooting section of this guide for interpretations.
Similar to finding the best flight deals from Shannon to Cologne, exploring the control panel’s features unlocks optimal pump performance. Regularly check the display for any anomalies, and remember to save any changes made to prevent reverting to default settings. Proper control panel utilization is crucial for efficient and safe operation.
Programming Custom Settings
Cadd pumps offer programmable settings to tailor operation to specific needs. Access these through the control panel’s advanced menu, typically requiring a password for security. Key customizable parameters include flow rate limits, pressure thresholds, and operational schedules.
Setting precise flow rates is vital, much like securing the best flight from Shannon to Cologne-Bonn requires specific date and time inputs. Define minimum and maximum flow rates to prevent over- or under-delivery. Pressure settings safeguard against system damage. Scheduling allows automated start/stop times, optimizing efficiency.
Before saving, carefully review all programmed values. Incorrect settings can lead to suboptimal performance or even equipment failure. Document your custom settings for future reference. Remember to test the programmed settings thoroughly to ensure they function as intended. Regular review and adjustment may be necessary based on changing application demands.

Remote Monitoring Options
Many Cadd pump models support remote monitoring, providing real-time data and control via networked devices. This capability enhances operational oversight and allows for proactive maintenance, similar to tracking flight details from Shannon to Cologne online. Connectivity is typically achieved through Ethernet, Wi-Fi, or cellular modules.
Remote access enables monitoring of key parameters like flow rate, pressure, pump status, and error codes. Alerts can be configured to notify personnel of critical events, such as pump failures or deviations from setpoints. Secure access protocols are crucial to protect against unauthorized control.
Integration with existing SCADA systems is often possible, allowing seamless data exchange and centralized control. Consider the network infrastructure requirements and security implications before implementing remote monitoring; Regularly update firmware and security protocols to maintain system integrity and prevent vulnerabilities.