
Cub Cadet ZT1 Transmission Belt Diagram PDF: A Comprehensive Guide
This guide provides detailed diagrams and instructions for the Cub Cadet ZT1 series, aiding in belt replacement and troubleshooting. Resources include official Cub Cadet websites and third-party diagram sources.
Understanding the ZT1 Series
Cub Cadet’s ZT1 series represents a robust line of zero-turn riding mowers, known for their durability and performance. These mowers utilize a hydrostatic transmission system, relying heavily on a network of belts to transfer power efficiently. Understanding the specific model – like the ZT1-54P (17AIEACMA10) – is crucial for locating the correct diagram.
The ZT1’s design prioritizes maneuverability and a comfortable operator experience. Proper belt maintenance, guided by a detailed diagram, ensures optimal functionality and prevents costly repairs. Familiarizing yourself with the transmission components is key.
Importance of a Transmission Belt Diagram
A precise transmission belt diagram is absolutely essential for successful ZT1 maintenance. It visually maps the complex belt routing, preventing incorrect installation which can lead to slippage or even transmission failure. Accessing a PDF version allows for easy printing and portability during repairs.
Without a diagram, identifying the correct belt size and placement becomes significantly harder. Correct routing ensures optimal power transfer and prevents premature wear. Utilizing a diagram saves time, reduces frustration, and safeguards the longevity of your Cub Cadet ZT1.
Locating the Correct Diagram
Finding the right diagram starts with your ZT1’s model number – often 17AIEACMA10. The official Cub Cadet website is a primary source, offering downloadable PDFs. Online parts lookup tools, utilizing your model, also display detailed diagrams.
Several third-party websites specialize in lawnmower parts diagrams, but verify accuracy. Search specifically for “Cub Cadet ZT1 54 inch belt diagram”. Ensure the diagram matches your specific year and deck size for correct belt routing information.

ZT1 54 Inch Model Belt Diagrams
Diagrams for the ZT1 54-inch deck illustrate specific belt routing. Accessing these PDFs is crucial for proper installation and maintenance of your mower.
Identifying Belt Routing for 54″ Decks
Understanding the belt path on a 54-inch deck is vital for correct reinstallation. Diagrams clearly show how the drive belt interacts with pulleys and the transmission.
Locating the correct PDF diagram, specifically for your ZT1 model, ensures accurate routing. Incorrect routing leads to slippage, inefficiency, and potential damage. Online parts lookup tools and the Cub Cadet website offer detailed visuals.
Pay close attention to the belt’s path around the spindles and the transmission pulley, referencing the diagram throughout the process.
Specific Diagram for 17AIEACMA10
Model number 17AIEACMA10 requires a specific belt routing diagram for optimal performance. Locating this diagram is crucial, as variations exist within the ZT1 series. Online resources and the Cub Cadet official website provide dedicated diagrams for this model.
The diagram details the precise path of the drive belt, including engagement with the transmission and deck pulleys. Referencing this specific diagram minimizes errors during replacement. Ensure the diagram matches your machine’s year of manufacture for accuracy.
Correct installation, guided by this diagram, prevents slippage and ensures efficient power transfer.

Common ZT1 Belt Replacement Issues
Frequent issues include belt slippage, breakage, and coming off the pulleys. Loose tension arms and worn pulleys contribute to these problems, requiring careful inspection.
Causes of Belt Failure
Several factors contribute to Cub Cadet ZT1 belt failures. Improper belt tension, whether too loose or excessively tight, drastically shortens belt life. Misalignment of pulleys, often due to impact damage or worn components, causes premature wear and fraying.
Environmental conditions, like debris and exposure to the elements, also play a role. Additionally, using incorrect belt specifications – wrong size or material – leads to rapid deterioration. Finally, worn transmission components, like bearings, increase stress on the belt, accelerating failure.
Recognizing Signs of a Worn Belt
Identifying a worn belt early prevents further damage. Look for visible cracks or fraying along the belt’s edges and ribbed surface. Slippage, indicated by a burning rubber smell or reduced cutting performance, is a key indicator.
Excessive wear causes the belt to stretch, impacting transmission efficiency. Inspect for glazing – a shiny appearance – signifying heat buildup and deterioration. Finally, frequent belt coming off suggests significant wear or misalignment, requiring immediate attention and potential component replacement.
Step-by-Step Belt Replacement Guide
Follow a detailed process: gather tools, remove the old belt carefully, install the new one correctly, and adjust tension for optimal ZT1 performance.
Tools Required for Replacement
Essential tools for a successful Cub Cadet ZT1 belt replacement include a socket wrench set, specifically for removing the deck and transmission components. A belt tool is crucial for easing the belt off pulleys. You’ll also need pliers, screwdrivers (Phillips and flathead), and potentially a hammer.
Gloves protect your hands, while safety glasses shield your eyes. A diagram (PDF or printed) is invaluable for correct routing. Consider a belt tension gauge for precise adjustments. Finally, penetrating oil can help loosen stubborn bolts, ensuring a smoother process.
Removing the Old Belt
Begin by disconnecting the spark plug for safety. Locate the belt routing using your diagram. Release the transmission tension arms to loosen the belt. Carefully work the belt off each pulley, noting its path for reinstallation.
Inspect the pulleys for damage or wear. A belt tool can assist in prying the belt free. Pay attention to any debris or obstructions. Document the belt’s condition – cracks or fraying indicate the reason for replacement. Dispose of the old belt responsibly.
Installing the New Belt
Refer to your diagram to ensure correct belt routing. Starting with the engine pulley, carefully guide the new belt onto each pulley, following the original path. Utilize a belt tool if needed to ease installation.
Double-check the belt is seated correctly in all pulley grooves. Ensure no twisting or overlapping occurs. Confirm the belt is fully engaged on each pulley before proceeding. Verify the belt matches the OEM specifications for proper fit and function.
Adjusting Belt Tension
Proper belt tension is crucial for optimal performance. Locate the tension adjustment mechanism, often involving spring-loaded arms. Loosen the locking nut, then adjust the tensioner to achieve the correct belt deflection – typically ½ to ¾ inches.
Retighten the locking nut securely after adjustment. Verify tension by pressing on the belt midway between pulleys. Insufficient tension causes slippage; excessive tension strains bearings. Regularly check and readjust as needed for peak efficiency.
Troubleshooting Belt-Related Problems
Common issues include belt slippage and frequent disengagement. Inspect tension arms and pulleys for damage or looseness, referencing diagrams for correct routing.
Belt Slippage Issues
Belt slippage on the Cub Cadet ZT1 often indicates insufficient tension or a worn belt. Diagrams are crucial for verifying correct belt routing, ensuring proper engagement with pulleys. Contamination from grass, debris, or oil reduces friction, causing slippage.
Inspect the belt for cracks, fraying, or glazing. A loose tension arm, as noted in online forums, can also contribute. Referencing the transmission belt diagram PDF helps confirm all components are aligned correctly, preventing premature wear and slippage during operation.
Belt Coming Off Frequently
Frequent belt disengagement on a Cub Cadet ZT1 suggests misalignment or excessive wear within the drive system. Utilizing a transmission belt diagram PDF is vital to confirm correct belt routing and pulley alignment. A loose tension arm, highlighted in user discussions, is a common culprit.
Inspect pulleys for damage or debris buildup. Worn bearings can also cause misalignment. Regularly checking and adjusting belt tension, guided by the diagram, prevents repeated disengagement and ensures optimal performance, avoiding costly repairs.

ZT1 Transmission System Overview
The ZT1 utilizes a hydrostatic transmission, relying on a belt-driven system for power transfer. Diagrams illustrate the transmission’s core components and operational flow.
Understanding the Drive System
The Cub Cadet ZT1’s drive system is a crucial element, converting engine power into blade speed. Diagrams reveal a system employing a series of belts connecting the engine to the transmission, and subsequently to the mower decks.
This setup allows for independent wheel control, enabling zero-turn maneuverability. Belt tension and alignment are paramount for efficient power transfer. Proper understanding, aided by detailed diagrams, is essential for maintenance and repair, ensuring optimal performance and longevity of the ZT1.
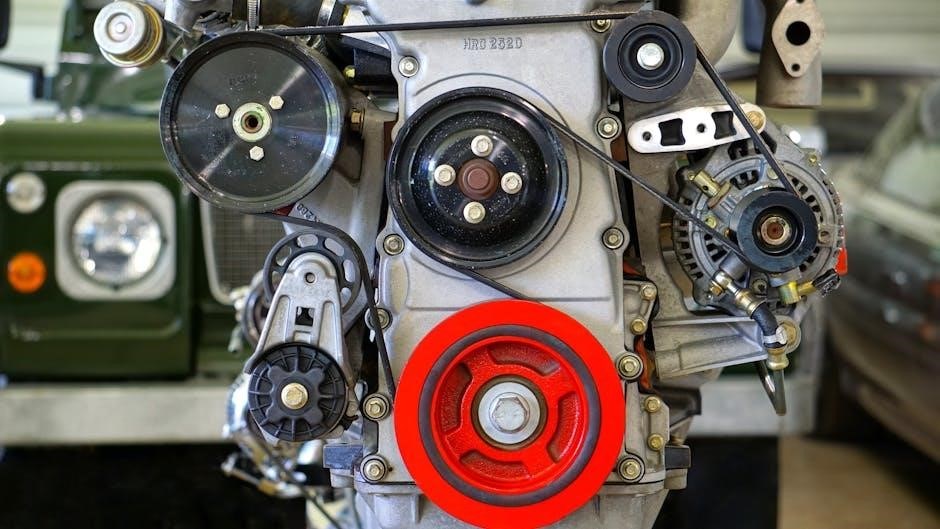
Components of the Transmission
The ZT1 transmission fundamentally comprises several key components working in unison. Diagrams illustrate the presence of a drive belt, pulleys, an idler arm for tensioning, and a spindle assembly. These elements facilitate power delivery from the engine to the mower decks.
Understanding each component’s role, as shown in detailed diagrams, is vital for effective maintenance. Proper function relies on correct belt routing, tension, and the integrity of pulleys and the idler arm, ensuring smooth and efficient operation of the Cub Cadet ZT1.

Resources for Diagrams and Parts
Locate diagrams and replacement parts through the Cub Cadet official website, online parts lookup tools, and various third-party websites specializing in lawnmower components.
Cub Cadet Official Website
Cub Cadet’s official website is the primary source for accurate ZT1 series transmission belt diagrams. Users can typically find detailed schematics by entering their specific model number – such as 17AIEACMA10 – into the parts lookup tool.
This ensures the diagram corresponds precisely to their machine’s configuration. The website also offers downloadable PDF manuals, parts lists, and access to authorized dealers for purchasing genuine Cub Cadet replacement belts. Regularly updated, it provides the most reliable information for maintenance and repair.
Online Parts Lookup Tools
Several online parts lookup tools simplify finding the correct ZT1 transmission belt diagram. These platforms, often associated with Cub Cadet parts retailers, allow users to input their model and serial number for precise results.
Diagrams are frequently interactive, highlighting belt routing and component locations. These tools often include exploded views, aiding in understanding the assembly. They streamline the process of identifying the correct belt size and specifications, ensuring a proper fit and optimal performance.
Third-Party Diagram Websites
Beyond the official Cub Cadet site, numerous third-party websites offer ZT1 transmission belt diagrams. These resources often compile diagrams from various sources, providing a broader selection. However, verifying the diagram’s accuracy for your specific model (like 17AIEACMA10) is crucial.
Online forums and lawn care communities frequently host user-submitted diagrams and troubleshooting advice. While helpful, cross-reference information with official sources to ensure reliability before undertaking any repairs or belt replacements.

Safety Precautions During Maintenance
Always disconnect the spark plug wire to prevent accidental starting. Wear protective gloves and eyewear during belt replacement for safe maintenance practices.
Disconnecting the Spark Plug
Before commencing any maintenance, including transmission belt work on your Cub Cadet ZT1, absolutely disconnect the spark plug wire. This crucial step prevents accidental engine starting, safeguarding against potential injuries. Locate the spark plug, typically near the engine, and firmly pull the wire boot off the terminal.
Secure the wire away from the plug to ensure it cannot reconnect during the process. Confirm the engine won’t start by briefly attempting to engage the starter. This simple precaution is paramount for a safe and successful maintenance experience.
Wearing Protective Gear
Prioritize safety by donning appropriate protective gear before undertaking any Cub Cadet ZT1 maintenance, especially transmission belt replacement. Essential items include safety glasses to shield your eyes from debris, and work gloves to protect your hands from sharp edges and potential abrasions.
Consider wearing sturdy footwear to prevent foot injuries. Long sleeves and pants offer additional protection. Remember, a safe working environment minimizes risks and ensures a smooth, trouble-free maintenance process for your lawn equipment.
Belt Types and Specifications
Genuine OEM belts ensure optimal performance for your Cub Cadet ZT1. Aftermarket options exist, but verifying correct size and material is crucial for reliable operation.
OEM vs. Aftermarket Belts
Original Equipment Manufacturer (OEM) belts, directly from Cub Cadet, are engineered for precise fit and durability, guaranteeing optimal performance with your ZT1. While generally more expensive, they often offer a longer lifespan and reduced risk of premature failure.
Aftermarket belts present a cost-effective alternative, but quality varies significantly. Careful selection is vital; ensure the belt meets or exceeds OEM specifications regarding size, material, and tensile strength. Using an incorrect belt can lead to slippage, decreased cutting efficiency, and potential damage to the transmission.
Consider the trade-offs between cost and reliability when choosing between OEM and aftermarket options for your Cub Cadet ZT1.
Correct Belt Size and Material
Identifying the correct belt size for your Cub Cadet ZT1 is crucial; consult your owner’s manual or a parts diagram – referencing the model number (e.g., 17AIEACMA10) is essential. Incorrect sizing leads to improper tension and premature wear.
Belt material typically consists of reinforced rubber compounds. High-quality belts utilize materials designed to withstand heat, abrasion, and the stresses of the ZT1’s transmission. Look for belts specifically rated for heavy-duty applications and zero-turn mowers.
Verify the belt’s length, width, and top cog profile match the original specification.

Preventative Maintenance for Belts
Regular inspection, cleaning debris, and proper lubrication extend belt life. A consistent schedule prevents premature wear and ensures optimal performance of your ZT1.
Regular Inspection Schedule
Consistent checks are vital for belt longevity. Inspect belts before each use for cracks, fraying, or glazing. A monthly deep dive should include tension verification and pulley alignment. After every 25 hours of operation, meticulously examine the belt’s condition, noting any signs of wear.
Annual maintenance should involve a complete system review, including the transmission components. Document all inspections and replacements. Following this schedule minimizes downtime and maximizes the lifespan of your Cub Cadet ZT1’s drive belt.
Cleaning and Lubrication
Regular cleaning prevents debris buildup, a major cause of premature belt wear. After each use, remove grass clippings and dirt from pulleys and the belt itself. Use a soft brush and avoid harsh chemicals.
Lubricate pulley bearings with a high-quality grease, following the manufacturer’s recommendations. Avoid getting lubricant on the belt, as this causes slippage. Proper cleaning and lubrication contribute significantly to a smooth-running transmission and extended belt life on your Cub Cadet ZT1.

Understanding Belt Tension Arms
Tension arms maintain proper belt tightness; looseness indicates wear or misalignment; Regular checks and adjustments are crucial for optimal ZT1 performance and belt longevity.
Checking for Looseness
Regularly inspect the belt tension arms on your Cub Cadet ZT1. Look for excessive play or movement within the arm’s pivot points. A loose arm compromises belt tension, leading to slippage and reduced cutting efficiency. Observe the arm during engine operation; noticeable bouncing or instability signals a problem.
Compare the movement to the opposite side’s arm for a baseline. If significant difference exists, further investigation is needed. Remember to disconnect the spark plug before any inspection to ensure safety. Addressing looseness promptly prevents premature belt wear and costly repairs.
Proper Adjustment Techniques
Adjusting belt tension correctly is crucial for optimal ZT1 performance. Locate the tension adjustment bolts, typically near the belt idler pulleys. Tighten the bolts incrementally, checking belt deflection after each adjustment. Aim for the manufacturer’s specified deflection – usually around ½ to ¾ inches.
Ensure both sides are adjusted equally to prevent uneven wear. Avoid over-tightening, which can damage bearings. Always re-check tension after the initial few hours of operation, as belts stretch during break-in. Refer to your diagram for specific adjustment points.